
I started just wanted to have a record of what I did and how I did it. But it turned out to be a fully blown “How To”. If you just want to look at the pretty picture, just click on the moon below. If you want to learn how to not get blurry blobs (like every other photo I have taken of the moon), then read on.

What is a super moon?
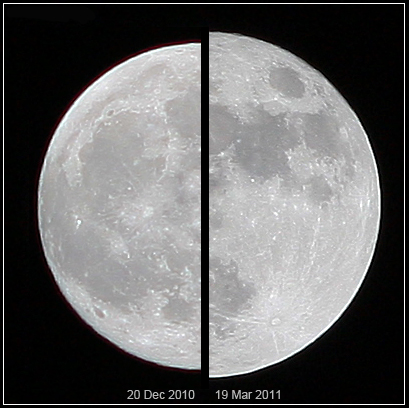
I like to include a fast fact in my blogs, so I’ll try and make it fast. Basically it’s when the moon is at it’s largest because it’s closest in it’s elliptical orbit around the Earth. This is an image of the difference taken from wikipedia.
I’ve wanted to take one of those really good shots that you see on websites or on the news for a long time. But often my shots came out too bright and I just got a blurry blob when they try and photograph the moon. Some people say they don’t have the equipment to do it, or that they just don’t have the skills. Others simply don’t care! I’m not sure which one your are, but if you’re one of the people who want to take the photo and don’t have the knowledge or the equipment, hopefully I’m here to help because you ‘may’ already have the equipment and hopefully, I’ll give you the skill. I’ll add link to some full moon dates below if you’re still interested after reading this blog.
How I shot my photo? What equipment did I use?
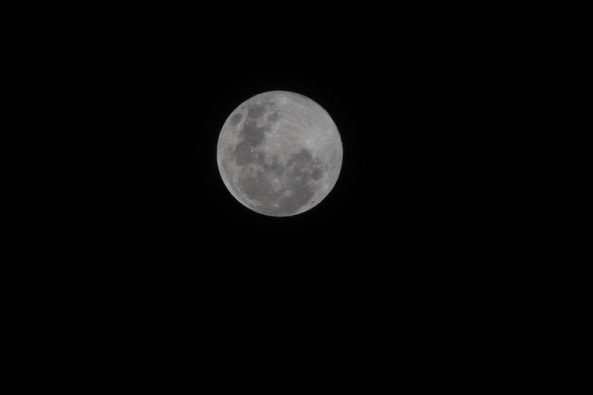
Well, I like shooting with my Canon 60D. It provides great quality images and even something as small as the moon (regardless how ‘Super’ it is) you need to crop the image down. Unless you have some super massive telescope on the end of your camera it’s only going to take up a small part of your screen. This is the shot I took before any cropping. Having more megapixels enables you to crop more. It’s one of the only benefits of having more megapixels.
Equipment
- Tripod
- Canon 60D Camera
- Sigma 150-500mm lens (courtesy of my brother Kevin). See, you don’t always need to own the best equipment. Someone else can own it for you 🙂
- Cable Release (to press the button without moving the camera)
Settings
- Shutter Speed: 1/160th of a second
- ISO: 100
- Aperture: f/11
- Focal Length (Zoom): 500 mm
- Manual Focus
So I put the camera on the tripod (which for many isn’t absolutely necessary). I did this to stop any extra movement and it means I can just set the camera up and just press the button without having to reframe my shot. People often worry about the shutter speed. It’s dark out there so you need a long shutter speed right? Wrong. The Moon is bright. I shot my photo at 1/160th of a second. That’s a pretty fast shutter speed and one you can almost hand hold. I say almost, and for some you might be able to. This is how hand hold versus zoom works.
Shutter Speed
Roughly, you can hold a camera still at anything faster than 1/60th of a second. That’s based on an average shot taken at a zoom (or focal length) of 50-60 mm. But when you zoom in, everything moves that little bit more. So when you are shooting at 500 mm, the speed you need to take the photo is 1/500th of a second. Or if you take a photo at 150 mm then it’s 1/150th of a second. Got it? BUT (cause there is always a But) this is a Good But. Many lenses or cameras have what is known as Image Stabilization, or Vibration Reduction (many names, different brands and similar result). So if a lens has a 3 stop VR or IS or USM (another name) it means you can hand hold the camera at a slower speed. For example, if you’re shooting at 500 mm and need a 1/500th shutter speed and you have a 3 stop IS, then you can take it at 1/60th of a second. That’s from 1/500th, to 1/250th (1 stop) 1/125th (2 stops) to 1/60th (3 stops) – In Theory. So I took mine at 1/160th to make sure.
You need to use Manual settings. If you use Automatic settings you have already missed out on the shot. You can use it to help, but change it to manual when you can (or as much manual as you are able). I know that some cameras won’t allow you to manually focus (more below). Most should allow you to set your camera to Manual Shutter Speed, ISO and Aperture.
ISO
I used an ISO of 100. Why? It’s the best setting because it catches light at a slower speed and produces best results. You could go up to a ‘faster’ ISO such as 200 or 400 or even higher, but the photo’s will get grainier as you increase. Nikon bottoms out at ISO 200 usually as do other camera’s. But try and use the lowest number if possible but you’ll still likely get a good result up to 800 or possibly even higher. This could mean a nice hand hold shutter speed of faster than 1/1000th of a second!
Aperture
You can play with this one a bit more than the others. Taking a photograph, and capturing light is all about these 3 elements. Shutter Speed/ISO and Aperture. They work with and against each other. I worked out, through trial and error that f/11 gave me a good result when using the Shutter Speed of 1/160th and ISO 100. But I wanted to keep it around there because often (and in this case) the lens is around it’s sharpest in the middle of the range. This lens (at 500 mm) has a maximum aperture of f/6.3. At that settings the photo’s can be a little soft. f/ll is sharper. If I needed to open up the aperture too much (bigger than f/8) I would have lowered my shutter speed or increased the ISO to 200 or 320.
Focal Length = Zoom
I zoom in as much as I could for obvious reasons. This massive crystal clear images of the moon are often made with a Full Frame camera with a 800 mm lens and 2x converter making them a 1600 mm lens (or even more on some other cameras. I will also say at this point that my Canon 60D has an APS-C sensor on it that effectively multiplies any lens zoom chucked on the front. That means that the 500 mm zoom is effectively an 800 mm zoom. If I could manage to put one of those big 800 mm zooms and 2 x teleconverter on the front, it would make it over 2500 mm and I could pretty well shake hands with the man on the moon. I’ll leave those photo’s to the spy world.
Focus
I mentioned earlier that you should use Manual Focus. I used manual, However I used spot metering (a setting you will find on your camera) that allows to you focus on a single spot. I focussed on the edge of the moon (because focus works best on contrasty things, like a white moon against a black sky) and as soon as it focussed, I switched off the automatic focus. This means the lens isn’t going in and out trying to focus on every shot. I find that really annoying.
So how can YOU do it if you don’t have a DSLR with a kick-arse lens loaned from your brother?
If you have a point and shoot with a big super zoom (24x zoom) like the Panasonic FZ200, then you’re quite capable of taking the photo. Just remember, try and put the camera on a tripod so you can just set it up and leave it, although you might be able to get a shot without it. But at the least, lean on something to reduce any movement. Use a low ISO to try and get a better image. Set your shutter speed to as fast as you can (to reduce any possible movement) as long as you can still get a shot with your aperture around the middle of the range (anywhere from f/8 to 16 works well). Even if you can’t adjust this and are stuck with whatever you get, it’ll work fine too.
If you don’t have full manual controls but you do have Shutter Priority (where you can choose your own shutter speed) then do this. Just make sure you meter of the middle of the moon only (spot metering), otherwise the camera will take into account all the blackness around the moon and mess up your photo (stoopid cameras don’t know it’s the moon your taking a photo of).
Good luck with your effort. It took me a while to get this shot. It can be really difficult to get a great shot because
- You can only do it once every 28 days. Here’s a link to the moon cycle dates for the next 12-18 months.
- The conditions have to be right. You get better results when it’s cold (clearer air), but often when it’s cold there are clouds.
- If you’re like me, you’ll remember it was a full moon the day after.
Let me know how you go and post a photo.

Some other Tips:
I use this to take some shots of the moon – not a supermoon with the same lens. -Yes it’s my lens!!
One tip is to use the Mirror Lock function.
On a Cannon you need to set the mode to a creative mode – i.e. manual, shutter priority.. etc
This requires 2 pushes of the “Shoot” button.
The first press the mirror locks up – you don’t get to see through the viewfinder – no mirror.
Wait a second or 2. Then press shoot again. The camera will then take the picture. No shake from the movement of the mirror flipping up.
Another tip is to use the live view mode. On my Cannon the “Live view” mode flips up the mirror and display the view on the screen. So you don’t get motion from the mirror. It also make it easy to look at what is in view as you don’t have to look through the viewfinder.
And lastly use the time remote.
On the Cannons you have a Timer of 2 seconds. This means that 2 seconds after you push the Shoot the picture will be taken. Any movement for the press will be gone.
I used a wireless remote with live view.
Good shot.
Thanks Kevin. I actually did use Live View (I meant to mention that). I checked my equipment back and I had forgotten my YongNuo RC603 which can double as a wireless remote. I had my wired remote so I used that.
I agree, Mirror Lock up (or Live View on a Canon) reduces any movement and makes a difference.
thanks for the added comments, they are spot on.
See this about mirror lockup.
http://www.cameratechnica.com/2011/04/26/dslr-mirror-lock-up-worth-the-effort-or-not/
Conclusion 5:
5.For some newer cameras, live-view mode may be a better alternative to mirror lock-up. By definition, the mirror will already be locked up to enable a live view of the light hitting the sensor.